Aeon Labs
Z-Wave Clamp Power Meter 2nd Generation - three clamps max. 60 Ampere
SKU: AEO_HEM3
Quickstart
This is a
Single click the little button behind the battery cover one time to include or exclude the device.
Important safety information
Please read this manual carefully. Failure to follow the recommendations in this manual may be dangerous or may violate the law. The manufacturer, importer, distributor and seller shall not be liable for any loss or damage resulting from failure to comply with the instructions in this manual or any other material. Use this equipment only for its intended purpose. Follow the disposal instructions. Do not dispose of electronic equipment or batteries in a fire or near open heat sources.Product Description
The Aeon Labs Smart Energy Monitor is a low-cost energy monitor for the entire home. It can wirelessly report immediate wattage and kWh usage to central control point gateways and can be easily installed. Installed in an electricity box, the energy meter will monitor the total consumption of electricity used by an entire building. And its intelligent clamps will report that energy use back to your control point, in watts or kilowatt-hours, and in real time. So you can see how much electricity you really use and when you use it.
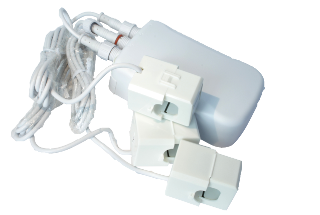
The main body is anchored using a back mount. The device is powered from a normal AC power supply. The device has three clamps and reports W and kWH (up to 60 Ampere).
Installation
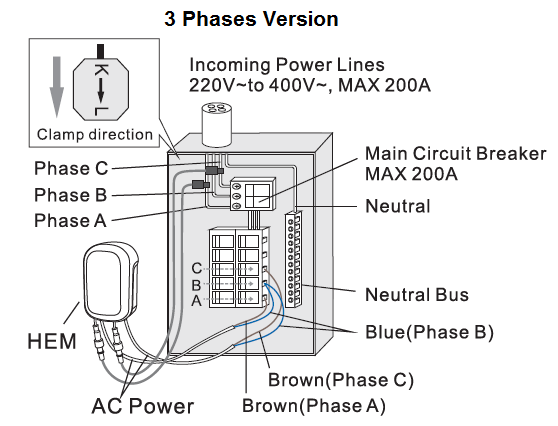
The installation of your Aeotec Home Energy Meter has two major parts: the installation of the meter into your Z-Wave network, and the installation of it into your AC mains electricity box. The electrical installation of your meter into your circuit box should only be done a licensed electrician with knowledge and understanding of electrical systems and electrical safety. You can perform the second half of the installation process, linking the meter with your Z-Wave network, yourself.
- Important: Turn the main breaker off and open the main circuit box panel.
- Clip clamps of the meter around the incoming electricity cables that connect to the main circuit breaker.
- Connect the clamp to the meter using a Clamp Connector.
- Connect the AC Wire to the meter using the AC Wire Connector.(option)
- Insert one of AC Power exposed wires into one of the neutral bus terminals and the other exposed wire into the live terminals coming from the main circuit breaker.
- Replace the main circuit box panel.
- Turn the main breaker back on.
If the circuit boxes is made of metal the radio signal strength may be reduced. In this situation it is recommended that the main body of the meter be affixed outside the circuit box. This will improve the radio signal strength. The Home Energy Meter G2 has been weatherized to the international IP44 standard so that it is resistant to rain and snow when placed vertically with the wires protruding from the bottom of the unit.
To place the Home Energy Meter:
- Slip open the backing plate from the back of your meter.
- Affix the plate to the selected wall space using the provided screws.
- Attach your meter to the backing plate.
After an electrician connects your Home Energy Meter to your electrical mains, you should include the meter into your Z-Wave network.
Product Usage
The Aeotec Home Energy Meter can report wattage energy usage or kWh energy usage to a control point when requested. If this function is supported by the controller point, the energy consumption will be displayed in the user interface of the control point. (The specific Z-Wave commands supporting energy monitoring are the Meter Command Class)
| Reset to factory default | XXXResetDescription |
| Inclusion | Single click the little button on the backside one time to include or exclude the device. |
| Exclusion | Single click the little button on the backside one time to include or exclude the device. |
| NIF | A single click on the little button on the backside sends a Node Information Frame. |
| Wakeup | XXXWakeupDescription |
| Protection | XXXProtection |
| FirmwareUpdate | XXXFirmwareUpdate |
| SetAssociation | XXXSetAssociation |
Association Groups:
| Group Number | Maximum Nodes | Description |
|---|---|---|
| 1 | 5 | Receiver of all Reports |
Configuration Parameters
Parameter 2: If the reverse clamping pliers, negative power is detected.
Size: 1 Byte, Default Value: 00
| Setting | Description |
|---|---|
| 00 | Disabled |
| 01 | Enabled |
Parameter 3: Automated Report only when power is changed
Size: 1 Byte, Default Value: 00
| Setting | Description |
|---|---|
| 00 | Disabled |
| 01 | Enabled |
Parameter 4: Minimum Change to send Report (Watt) for the whole HEM
The value represents the minimum change in Wattage for a Report to be sent . Size: 2 Byte, Default Value: 0032
| Setting | Description |
|---|---|
| 00 - 6000 | Value in W |
Parameter 5: Minimum Change to send Report (Watt) for clamp 1
The value represents the minimum change in Wattage for a Report to be sent . Size: 2 Byte, Default Value: 0032
| Setting | Description |
|---|---|
| 00 - 6000 | Value in W |
Parameter 6: Minimum Change to send Report (Watt) for clamp 2
The value represents the minimum change in Wattage for a Report to be sent . Size: 2 Byte, Default Value: 0032
| Setting | Description |
|---|---|
| 00 - 6000 | Value in W |
Parameter 7: Minimum Change to send Report (Watt) for clamp 3
The value represents the minimum change in Wattage for a Report to be sent . Size: 2 Byte, Default Value: 0032
| Setting | Description |
|---|---|
| 00 - 6000 | Value in W |
Parameter 8: Minimum Change to send Report (%) for the whole HEM
The value represents the minimum change in Watage Percent for a report to be sent Size: 1 Byte, Default Value: 0a
| Setting | Description |
|---|---|
| 00 - 100 | Value in % |
Parameter 9: Minimum Change to send Report (%) for clamp 1
The value represents the minimum change in Watage Percent for a report to be sent Size: 1 Byte, Default Value: 0a
| Setting | Description |
|---|---|
| 00 - 100 | Value in % |
Parameter 10: Minimum Change to send Report (%) for clamp 2
The value represents the minimum change in Watage Percent for a report to be sent Size: 1 Byte, Default Value: 0a
| Setting | Description |
|---|---|
| 00 - 100 | Value in % |
Parameter 11: Minimum Change to send Report (%) for clamp 3
The value represents the minimum change in Watage Percent for a report to be sent Size: 1 Byte, Default Value: 0a
| Setting | Description |
|---|---|
| 00 - 100 | Value in % |
Parameter 13: Enable /disable reporting CRC-16 Encapsulation Command
Size: 1 Byte, Default Value: 00
| Setting | Description |
|---|---|
| 00 | Disabled |
| 01 | Enabled |
Parameter 101: Report type send in Reporting Group 1
Defines the type of report sent for the Reporting Group 1. Size: 4 Byte, Default Value: 00000008
| Setting | Description |
|---|---|
| Byte 1: 00000010 | Battery Report |
| Byte 1: 00000100 | MultiSensor Report for the whole device |
| Byte 1: 00001000 | Meter Report for Watt for the whole device |
| Byte 1: 00010000 | Meter Report for kWh for the whole device |
| Byte 2: 00000010 | Meter Report for Watt for clamp 1 |
| Byte 2: 00000100 | Meter Report for Watt for clamp 2 |
| Byte 2: 00001000 | Meter Report for Watt for clamp 3 |
| Byte 2: 00010000 | Meter Report for kWh for clamp 1 |
| Byte 2: 00100000 | Meter Report for Watt for clamp 2 |
| Byte 2: 01000000 | Meter Report for kWh for clamp 3 |
Parameter 102: Report Type send in Reporting Group 2
Defines the type of report sent for the Reporting Group 2. Size: 4 Byte, Default Value: 00000000
| Setting | Description |
|---|---|
| Byte 1: 00000010 | Battery Report |
| Byte 1: 00000100 | MultiSensor Report for the whole device |
| Byte 1: 00001000 | Meter Report for Watt for the whole device |
| Byte 1: 00010000 | Meter Report for kWh for the whole device |
| Byte 2: 00000010 | Meter Report for Watt for clamp 1 |
| Byte 2: 00000100 | Meter Report for Watt for clamp 2 |
| Byte 2: 00001000 | Meter Report for Watt for clamp 3 |
| Byte 2: 00010000 | Meter Report for kWh for clamp 1 |
| Byte 2: 00100000 | Meter Report for Watt for clamp 2 |
| Byte 2: 01000000 | Meter Report for kWh for clamp 3 |
Parameter 103: Report Type send in Reporting Group 3
Defines the type of report sent for the Reporting Group 3. Size: 4 Byte, Default Value: 00000000
| Setting | Description |
|---|---|
| Byte 1: 00000010 | Battery Report |
| Byte 1: 00000100 | MultiSensor Report for the whole device |
| Byte 1: 00001000 | Meter Report for Watt for the whole device |
| Byte 1: 00010000 | Meter Report for kWh for the whole device |
| Byte 2: 00000010 | Meter Report for Watt for clamp 1 |
| Byte 2: 00000100 | Meter Report for Watt for clamp 2 |
| Byte 2: 00001000 | Meter Report for Watt for clamp 3 |
| Byte 2: 00010000 | Meter Report for kWh for clamp 1 |
| Byte 2: 00100000 | Meter Report for Watt for clamp 2 |
| Byte 2: 01000000 | Meter Report for kWh for clamp 3 |
Parameter 111: Send Interval for Reporting Group 1
Defines the time interval when the defined report of Reporting Group 1 is sent out. Size: 1 Byte, Default Value: 01
| Setting | Description |
|---|---|
| 00 - 127 | Value in s |
Parameter 112: Send Interval for Reporting Group 2
Defines the time interval when the defined report of Reporting Group 2 is sent out. Size: 1 Byte, Default Value: 01
| Setting | Description |
|---|---|
| 00 - 127 | Value in s |
Parameter 113: Send Interval for Reporting Group 3
Defines the time interval when the defined report of Reporting Group 3 is sent out. Size: 1 Byte, Default Value: 01
| Setting | Description |
|---|---|
| 00 - 127 | Value in s |
Parameter 100: Set 101-103 to default
Size: 1 Byte, Default Value: 01
| Setting | Description |
|---|
Parameter 110: Set 111-113 to default
Size: 1 Byte, Default Value: 01
| Setting | Description |
|---|
Parameter 200: Partner ID
(0= Aeon Labs Standard Product, 1= AT&T). Size: 1 Byte, Default Value: 01
| Setting | Description |
|---|
Parameter 252: Enable/disable Configuration Locked
0 =disable, 1 = enable Size: 1 Byte, Default Value: 00
| Setting | Description |
|---|---|
| 00 | 0 = disabled |
| 01 | 1 = enabled |
Parameter 254: Device Tag
Size: 2 Byte, Default Value: 0000
| Setting | Description |
|---|
Parameter 255: Reset
Reset configuration set up to default setting Size: 1 Byte, Default Value: 00
| Setting | Description |
|---|
Technical Data
| Dimensions | 0.0640000x0.1000000x0.0380000 mm |
| Weight | 330 gr |
| EAN | 1220000011670 |
| Battery Type | 4 * AA |
| Firmware Version | 01.05 |
| Z-Wave Version | 03.43 |
| Certification ID | ZC08-10080007 |
| Z-Wave Product Id | 0086.0002.001c |
| Frequency | Europe - 868,4 Mhz |
| Maximum transmission power | 5 mW |