Eurotronic
Wall Radiator Thermostat Valve Control
SKU: EUR_STELLAZ
Quickstart
This is a
All operation is performed using the little button behind the round hole in the enclosure. Please use the tool provided to operate the button. Pushing the button for 2.5 seconds will turn the device into install mode where the valve control is moved into end position to allows installation of the device. Pushing the button for 5 seconds will confirm inclusion or exclusion of the device. A single click wakes up the device when sleeping. Attention: You must apply the device to the valve before applying any wireless setups and actions. Without the back pressure from the valve the device will turn into error mode. in This mode no wireless operation is performed.
Important safety information
Please read this manual carefully. Failure to follow the recommendations in this manual may be dangerous or may violate the law. The manufacturer, importer, distributor and seller shall not be liable for any loss or damage resulting from failure to comply with the instructions in this manual or any other material. Use this equipment only for its intended purpose. Follow the disposal instructions. Do not dispose of electronic equipment or batteries in a fire or near open heat sources.What is Z-Wave?
Z-Wave is the international wireless protocol for communication in the Smart Home. This device is suited for use in the region mentioned in the Quickstart section.
Z-Wave ensures a reliable communication by reconfirming every message (two-way communication) and every mains powered node can act as a repeater for other nodes (meshed network) in case the receiver is not in direct wireless range of the transmitter.
This device and every other certified Z-Wave device can be used together with any other certified Z-Wave device regardless of brand and origin as long as both are suited for the same frequency range.
If a device supports secure communication it will communicate with other devices secure as long as this device provides the same or a higher level of security. Otherwise it will automatically turn into a lower level of security to maintain backward compatibility.
For more information about Z-Wave technology, devices, white papers etc. please refer to www.z-wave.info.
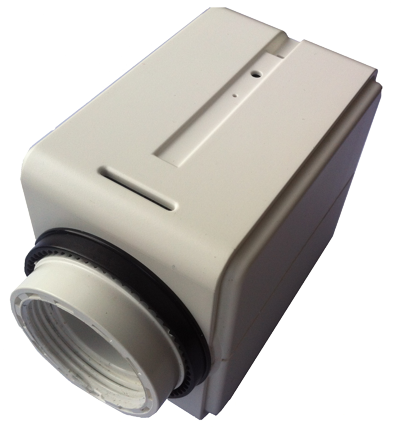
Product Description
StellaZ is a wireless Thermostat Valve Control capable controlling heating, air ventilation and climate control units. Sensors, control and actuator are combined in one single device allowing stand alone energy efficient room control.The device can run in four different operation modes (Off, Energy Saving, Comfort, Direct Control) to control the temperature. The room temperature can also be reported by the device. Open windows will be recognized and lead to a lower control temperature for 20 minutes to prevent waste of energy. Further functions of StellaZ are:
- Very high precision, valve speed only 3s/mm, low noise, max. valve distance: 4 mm.
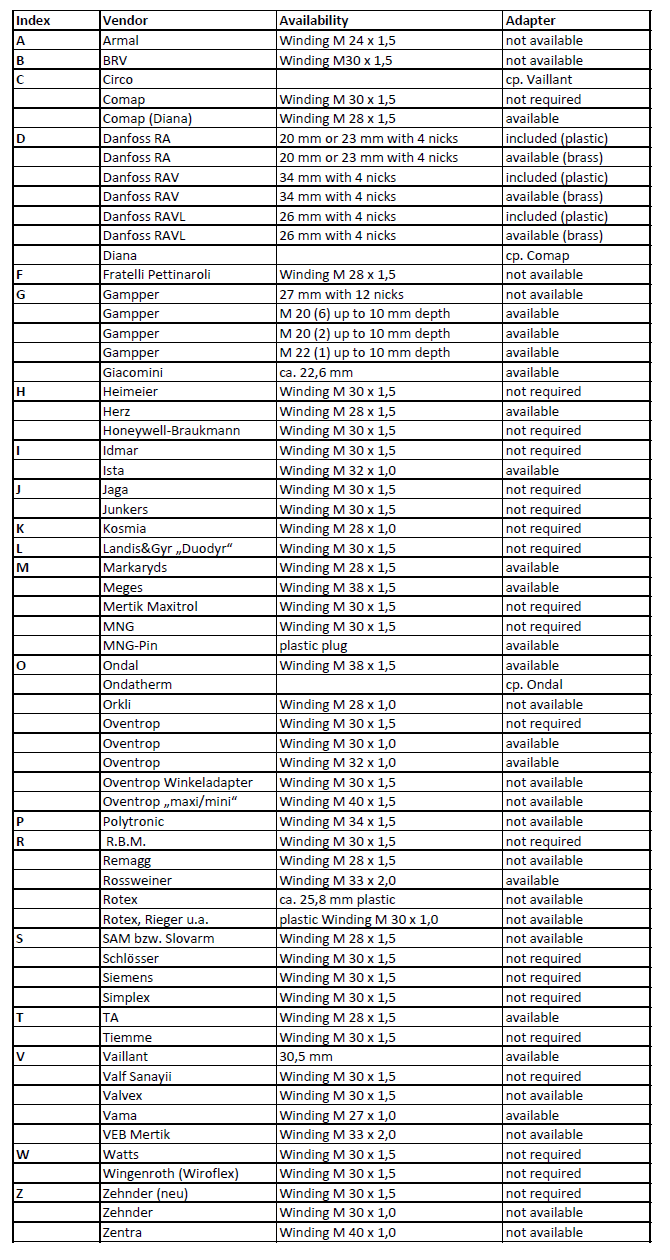
- Connection to Valve: M 30 x 1,5, Adapters for other valve types available (e.g. Heimeier, Danfoss, Honeywell Braukmann, Honeywell MNG, Oventrop from 1996 on) are part of scope of delivery.
- Protected installation, removal only possible with special tool provided as part of scope of delivery.
Prepare for Installation / Reset
Please read the user manual before installing the product.
In order to include (add) a Z-Wave device to a network it must be in factory default state. Please make sure to reset the device into factory default. You can do this by performing an Exclusion operation as described below in the manual. Every Z-Wave controller is able to perform this operation however it is recommended to use the primary controller of the previous network to make sure the very device is excluded properly from this network.
Installation
Installation 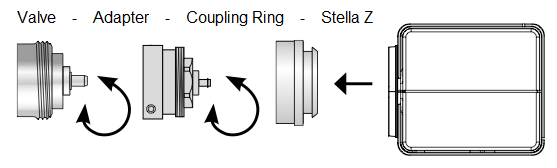
The installation of the valve control is easy with any dirt of loss of water since the heating pipe system will not be interrupted.
- If needed select an adapter and mount this adapter to the valve.
- Insert Batteries. Pushing the little button behind the round hole for 2.5 seconds turns the device into the install mode. In this mode the valve actuator is moved into the inner end position to simplify the installation of the device.
- Continous pushing of the button starts the calibration function. The both end position of the valve will be detected automatically. Without further operation of the button this calibration wil starts automatically after 3 minutes. the devices will go into sleep state after finisheding the calibration.
- Turn the white coupling ring onto the the valve resp. the adapter.
- Push StellaZ to the white coupling ring until you hear is snapping in.
Attention: You must apply the device to the valve before applying any wireless setups and actions. Without the back pressure from the valve the device will turn into error mode.
Deinstallation
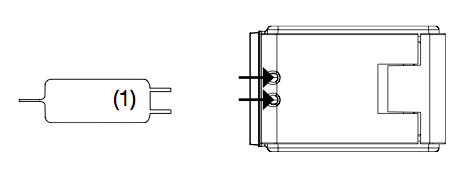
- Push both pins of the demounting tool into the two holes on the enclosure.
- Remove Stella Z from the adapter or valve.
Inclusion/Exclusion
On factory default the device does not belong to any Z-Wave network. The device needs to be added to an existing wireless network to communicate with the devices of this network. This process is called Inclusion.
Devices can also be removed from a network. This process is called Exclusion. Both processes are initiated by the primary controller of the Z-Wave network. This controller is turned into exclusion respective inclusion mode. Inclusion and Exclusion is then performed doing a special manual action right on the device.
Inclusion
Pressing the button behind the round hole in the enclosure for 5 sec. will confirm inclusion and exclusion. Right after inserting the battery the device will stay in the auto inclusion mode for 3 minutes. In this mode a controller in inclusion mode can include the device without any further manual confirmation on the device.
Exclusion
Pressing the button behind the round hole in the enclosure for 5 sec. will confirm inclusion and exclusion. Right after inserting the battery the device will stay in the auto inclusion mode for 3 minutes. In this mode a controller in inclusion mode can include the device without any further manual confirmation on the device.
Product Usage
The device does not allow any local operation on the device itself but control via Z-Wave radio from a Z-wave controller only. The thermostat has four operating modes. They are switched wirelessly as well:
- Frost Protection: The temperature in the room will be regulated to about 6 °C.
- Comfort: The temperature in the room will be regulated to a comfortable level. On factory default this is 22 °C but the value can be adjusted by the respective Z-Wave command "Thermostat Setpoint" to a value between 0 °C and 50 °C. This mode is active on factory default.
- Energy Saving: The temperature in the room will be regulated to a energy saving level. On factory default this is 18 °C but the value can be adjusted by the respective Z-Wave command "Thermostat Setpoint" to a value between 0 °C and 50 °C.
- Direct Valve Control: This mode allows the direct control of the valve as percentage value of opening using the Z-Wave command class "Switch Multilevel". The regulation of a temperature within the device is deactivated.
Additionally to regulating the temperature the valve control is reporting the measured temperature on request (using the command class "Sensor Multilevel" implementing communication pattern 3). It may happen that the reported temperature will remain 0 °C for some minutes due to calibration. After the first regular wakeup the temperature value will however be correct. Switching between the four modes is accomplished using the Z-Wave command classes "Thermostat Mode" and "Basic". The following mappings apply:
- Frost Protection: BASIC SET 0x01, THERMOSTAT MODE SET 0x00
- Energy Saving: BASIC SET 0x00, THERMOSTAT MODE SET 0x0b
- Comfort: BASIC SET 0xff, THERMOSTAT MODE SET 0x01
- Direct Control: BASIC SET 0xfe, THERMOSTAT MODE SET 0x1f
Node Information Frame
The Node Information Frame (NIF) is the business card of a Z-Wave device. It contains information about the device type and the technical capabilities. The inclusion and exclusion of the device is confirmed by sending out a Node Information Frame. Beside this it may be needed for certain network operations to send out a Node Information Frame. To issue a NIF execute the following action:
A single click on the button behind the round hole in the enclosure sends out a Node Information Frame.
Communication to a Sleeping device (Wakeup)
This device is battery operated and turned into deep sleep state most of the time to save battery life time. Communication with the device is limited. In order to communicate with the device, a static controller C is needed in the network. This controller will maintain a mailbox for the battery operated devices and store commands that can not be received during deep sleep state. Without such a controller, communication may become impossible and/or the battery life time is significantly decreased.
This device will wakeup regularly and announce the wakeup state by sending out a so called Wakeup Notification. The controller can then empty the mailbox. Therefore, the device needs to be configured with the desired wakeup interval and the node ID of the controller. If the device was included by a static controller this controller will usually perform all necessary configurations. The wakeup interval is a tradeoff between maximal battery life time and the desired responses of the device. To wakeup the device please perform the following action:
One Click on the button behind the round hole in the enclosure will wakeup the device and keeps it awake for 5 seconds. The wakeup interval can be defined between 4 minutes and 180 day in steps of 4 minutes. The factory default value is 7 days.
Quick trouble shooting
Here are a few hints for network installation if things dont work as expected.
- Make sure a device is in factory reset state before including. In doubt exclude before include.
- If inclusion still fails, check if both devices use the same frequency.
- Remove all dead devices from associations. Otherwise you will see severe delays.
- Never use sleeping battery devices without a central controller.
- Dont poll FLIRS devices.
- Make sure to have enough mains powered device to benefit from the meshing
Technical Data
| Dimensions | 0.0480000x0.0630000x0.0740000 mm |
| Weight | 100 gr |
| EAN | 4260012710960 |
| Firmware Version | 00.04 |
| Z-Wave Version | 03.2a |
| Certification ID | ZC08-13050002 |
| Z-Wave Product Id | 0148.0001.0001 |
| Frequency | Europe - 868,4 Mhz |
| Maximum transmission power | 5 mW |
Supported Command Classes
- Basic
- Thermostat Mode
- Thermostat Setpoint
- Wake Up
- Version
- Switch Multilevel
- Battery
- Sensor Multilevel
- Manufacturer Specific
- Node Naming
Explanation of Z-Wave specific terms
- Controller — is a Z-Wave device with capabilities to manage the network. Controllers are typically Gateways,Remote Controls or battery operated wall controllers.
- Slave — is a Z-Wave device without capabilities to manage the network. Slaves can be sensors, actuators and even remote controls.
- Primary Controller — is the central organizer of the network. It must be a controller. There can be only one primary controller in a Z-Wave network.
- Inclusion — is the process of adding new Z-Wave devices into a network.
- Exclusion — is the process of removing Z-Wave devices from the network.
- Association — is a control relationship between a controlling device and a controlled device.
- Wakeup Notification — is a special wireless message issued by a Z-Wave device to announces that is able to communicate.
- Node Information Frame — is a special wireless message issued by a Z-Wave device to announce its capabilities and functions.