NodOn
NodOn wall switch (white/gray)
SKU: NODECWS3101


Quickstart
This is a
Important safety information
Please read this manual carefully. Failure to follow the recommendations in this manual may be dangerous or may violate the law. The manufacturer, importer, distributor and seller shall not be liable for any loss or damage resulting from failure to comply with the instructions in this manual or any other material. Use this equipment only for its intended purpose. Follow the disposal instructions. Do not dispose of electronic equipment or batteries in a fire or near open heat sources.Product Description
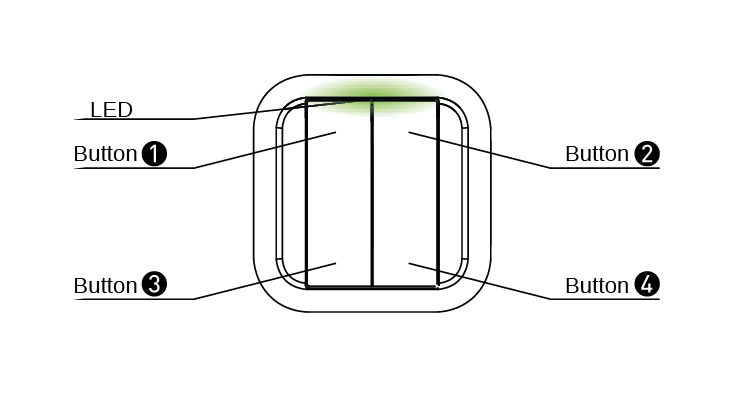
The NodOn® wall switch controls any compatible receivers Z-Wave® or Z-Wave Plus®, such as the Smart Plug NodOn®. It can address, directly, up to 4 groups of 8 devices and sent up to 16 different scenes to a Home Automation Gateway. This controller can operate on its own (“Standalone” Mode) or as gateway’s assistant (“Gateway” Mode). The product integrates a LED, which give an intuitive feedback for each operation you perform.
Based on an innovative technology, the NodOn® wall switch is only powered with a CR2032 battery, offering 2 years’ autonomy.
The NodOn® wall switch can be screwed or bonded thanks of the
adhesive tape included.
The NodOn® wall switch is based on brand new 500 series Z-Wave® module from Sigma Designs®, and supports all the new features of Z-Wave Plus® standard:
Longer range (up to 40 meters indoor), lower power consumption, higher data rate transmission, and many more new features.
Installation


Product Usage


Green Above 50%

| Reset to factory default | Simultaneously push on buttons 3 and 4, during 1 second. The LED will blink red and green to validate the factory reset. |
| Inclusion | 1) Push 3 times (quickly) on the button 1. The LED blinks in blue. 2) Place the device you want to add in “Learning” Mode. To do so, please refer to your device’s user guide. The LED blinks in green to confirm the inclusion. Note: If you wish to include and associate a device, please refer to "Other Special Features" |
| Exclusion | 1) Push 3 times (quickly) on the button 4. - The LED blinks in blue. 2) Place the device you want to remove in “Learning” Mode. To do so, please refer to your device’s user guide. The LED blinks in green to confirm the exclusion. |
| NIF | XXXNIF |
| Wakeup | When the product in "Gateway" mode, any action on button will send a wake up notification to the gateway. |
| Protection | XXXProtection |
| FirmwareUpdate | XXXFirmwareUpdate |
| SetAssociation | ASSOCIATION
1) Push 3 times (quickly) on the 1 button to activate the “Association” Mode. The LED glows in blue
2) Choose which button will control your device, within 10 seconds.
• A short press on one of the buttons of the wall switch (1, 2, 3 or 4 will activate the MONO Profile. The pressed button will then control your device.
• A long press on the 1 button will activate the DUO Profile, combined with the 3 button. The 1 (ON) and 3 (OFF) buttons will then control your device.
• A long press on the 2 button will activate the DUO profile, combined with the 4 button. The 2 (ON) and 4 (OFF) buttons will then control your device.
The LED blinks in blue to confirm your choice 3) Place the device you want to associate in “Learning” Mode, within 10 seconds. To do so, please refer to your device’s user guide.
The LED of the wall switch blinks green to confirm the association process
Careful : In case of a too long association process or others problems during the process, the LED will blink red. Please restart the procedure. DISASSOCIATION
The disassociation deletes any association relationship between the device and the wall switch’s buttons. However, your device will remain in your wall switch’s Z-Wave® network. 1) Push 3 times (quickly) on the 2 button. The LED blinks in blue
2) Place the device you want to disassociate in “Learning” Mode, within 10 seconds. To do so, please refer to your device’s user guide.
The LED blinks in green to confirm the disassociation
|
Association Groups:
| Group Number | Maximum Nodes | Description |
|---|---|---|
| 1 | 1 | Lifeline. This group is used to report information of the Wall Switch to the Main Controller of the network. |
| 2 | 8 | Button 1 - MONO - Controlled nodes. - A short press will activate (ON) your associated devices - A second short press will deactivate (OFF) your associated devices. If some of the associated devices have dimming features (light dimmer, roller shutter, etc.): - A long press will dim up your associated devices (light, roller shutter, etc.) until you release the button - A second long press on the same button will dim down your associated devices (light, roller shutter, etc.) until you release the button. |
| 3 | 8 | Button 2 - MONO - Controlled nodes. - A short press will activate (ON) your associated devices - A second short press will deactivate (OFF) your associated devices. If some of the associated devices have dimming features (light dimmer, roller shutter, etc.): - A long press will dim up your associated devices (light, roller shutter, etc.) until you release the button - A second long press on the same button will dim down your associated devices (light, roller shutter, etc.) until you release the button. |
| 4 | 8 | Button 3 - MONO - Controlled nodes. - A short press will activate (ON) your associated devices - A second short press will deactivate (OFF) your associated devices. If some of the associated devices have dimming features (light dimmer, roller shutter, etc.): - A long press will dim up your associated devices (light, roller shutter, etc.) until you release the button - A second long press on the same button will dim down your associated devices (light, roller shutter, etc.) until you release the button. |
| 5 | 8 | Button 4 - MONO - Controlled nodes. - A short press will activate (ON) your associated devices - A second short press will deactivate (OFF) your associated devices. If some of the associated devices have dimming features (light dimmer, roller shutter, etc.): - A long press will dim up your associated devices (light, roller shutter, etc.) until you release the button - A second long press on the same button will dim down your associated devices (light, roller shutter, etc.) until you release the button. |
| 6 | 8 | Buttons 1&3 - DUO - Controlled nodes - A short press on button 1 will activate (ON) your associated devices. - A short press on button 3 will deactivate (OFF) your associated devices. If some of the associated devices have dimming features (light dimmer, roller shutter, etc.) - A long press on button 1 will dim up your associated device (light, roller shutter, etc.) until you release the button. - A long press on button 3 will dim down your associated device (light, roller shutter, etc.) until you release the button. |
| 7 | 8 | Buttons 2&4 - DUO - Controlled nodes - A short press on button 2 will activate (ON) your associated devices. - A short press on button 4 will deactivate (OFF) your associated devices. If some of the associated devices have dimming features (light dimmer, roller shutter, etc.) - A long press on button 1 will dim up your associated device (light, roller shutter, etc.) until you release the button. - A long press on button 3 will dim down your associated device (light, roller shutter, etc.) until you release the button. |
Special Operations as Z-Wave Controller
As long as this device is not included into a Z-Wave network of a different controller it is able to manage its own Z-Wave network as primary controller. As a primary controller the device can include and exclude other devices in its own network, manage associations, and reorganize the network in case of problems. The following controller functions are supported:
Inclusion of other devices
Communication between two Z-Wave devices only works if both belong to the same wireless network. Joining a network is called inclusion and is initiated by a controller. The controller needs to be turned into the inclusion mode. Once in this inclusion mode the other device needs to confirm the inclusion - typically by pressing a button.
If current primary controller in your network is in special SIS mode this and any other secondary controller can also include and exclude devices.
To become primary a contoller have to be resetted and then include a device.
The LED blinks in blue
2) Place the device you want to add in “Learning” Mode, within 10 seconds. To do so, please refer to your device’s user guide.
Exclusion of other devices
The primary controller can exclude devices from the Z-Wave network. During exclusion the relationship between the device and the network of this controller is terminated. No communication between the device and other devices still in the network can happen after a successful exclusion. The controller needs to be turned into the exclusion mode. Once in this exclusion mode the other device needs to confirm the exclusion - typically by pressing a button.
Attention: Removing a device from the network means that it is turned back into factory default status. This process can also exclude devices from it's previous network.
The LED blinks in green to confirm the exclusion
Configuration Parameters
Parameter 1: Buttons 1 & 3 Profile
To set-up the profie of buttons 1 & 3s Size: 1 Byte, Default Value: 0
| Setting | Description |
|---|---|
| 0 | SCENE. Product sends - Central Scene Notification Commands or Scene Activation Commands. |
| 1 | MONO. Button 1 is not paired with button 3. |
| 2 | DUO. Button 1 is paired with button 3. |
Parameter 2: Buttons 2 & 4 Profile
To set-up the profie of buttons 2 & 4 Size: 1 Byte, Default Value: 0
| Setting | Description |
|---|---|
| 0 | SCENE. Product sends Central Scene Notification Commands or Scene Activation Commands. |
| 1 | MONO. Button 1 is not paired with button 3. |
| 2 | DUO. Button 1 is paired with button 3. |
Parameter 3: Scene Type
To choose the way of sending Scene to the gateway Size: 1 Byte, Default Value: 0
| Setting | Description |
|---|---|
| 0 | Use CENTRAL SCENE Commands. |
| 1 | Use SCENE ACTIVATION Commands. |
Parameter 4: Button 1 Configuration
To set-up the how button 1 behaves, when set in MONO Profie Size: 1 Byte, Default Value: 0
| Setting | Description |
|---|---|
| 0 | Single Press sends Basic Setup Command to associated devices in Group 2. |
| 1 | Single Press sends broadcast Switch All On Command. |
| 2 | Single Press sends broadcast Switch All Off Command. |
Parameter 5: Button 2 Configuration
To set-up the how button 2 behaves, when set in MONO Profie Size: 1 Byte, Default Value: 0
| Setting | Description |
|---|---|
| 0 | Single Press sends Basic Set Command to associated devices in Group 3. |
| 1 | Single Press sends broadcast Switch All On Command. |
| 2 | Single Press sends broadcast Switch All Off Command. |
Parameter 6: Button 3 Configuration
To set-up the how button 3 behaves, when set in MONO Profie Size: 1 Byte, Default Value: 0
| Setting | Description |
|---|---|
| 0 | Single Press sends Basic Set Command to associated devices in Group 4. |
| 1 | Single Press sends broadcast Switch All On Command. |
| 2 | Single Press sends broadcast Switch All Off Command. |
Parameter 7: Button 4 Configuration
To set-up the how button 4 behaves, when set in MONO Profie Size: 1 Byte, Default Value: 0
| Setting | Description |
|---|---|
| 0 | Single Press sends Basic Set Command to associated devices in Group 5. |
| 1 | Single Press sends broadcast Switch All On Command. |
| 2 | Single Press sends broadcastSwitch All Off Command. |
Parameter 8: Led Management
How to set up LED behaviour Size: 1 Byte, Default Value: 0
| Setting | Description |
|---|---|
| 0 | Led does not acknowledge button action and does not acknowledge result of radio command sent. |
| 1 | When the end-user performs a Single press, Double press or Hold Press on a button, led blinks blue to acknowledge the button action. |
| 2 | When the end-user sends a controlled command: (Basic Set Command, Central Scene Notificationu Command, Multilevel Switch Stop Level Change Command Led blinks GREEN to acknowledge transmission success or blinks RED to acknowledge transmission failed.) |
| 3 | Combined behaviors of 1 and 2 modes. |
Technical Data
| Dimensions | 80x80x15 mm |
| Weight | 52 gr |
| Hardware Platform | ZM5202 |
| EAN | 3700313920268 |
| IP Class | IP 20 |
| Device Type | Remote Control - Multi Purpose |
| Network Operation | Portable Controller |
| Z-Wave Version | 6.51.06 |
| Certification ID | ZC10-15070008 |
| Z-Wave Product Id | 0x0165.0x0002.0x0003 |
| Frequency | Europe - 868,4 Mhz |
| Maximum transmission power | 5 mW |