Secure
Wall Thermostat with LCD display
SKU: SECESRT321-5

Quickstart
This is a
Important safety information
Please read this manual carefully. Failure to follow the recommendations in this manual may be dangerous or may violate the law. The manufacturer, importer, distributor and seller shall not be liable for any loss or damage resulting from failure to comply with the instructions in this manual or any other material. Use this equipment only for its intended purpose. Follow the disposal instructions. Do not dispose of electronic equipment or batteries in a fire or near open heat sources.Product Description
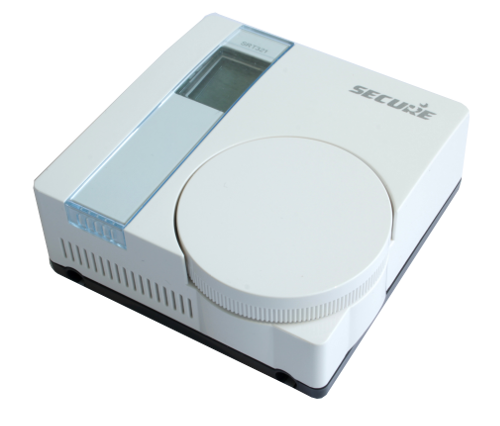
The SRT321 is a battery operated wall thermostat. Using a big wheel on the device the user can preset the desired target temperature in the room. By verifying the target temperature with the measured real temperature closed to the device the unit decides how to operate a wirelessly attached power switch that is attached to the heater. In parallel a central gateway of Z-Wave control software can set the target temperature using Z-Wave. This enables to realize a time scheduled zone heating. The thermostat itself does not have any internal timers but executes the wireless settings (COMMAND CLASS THERMOSTAT_SETPOINT) and the local setup.
Installation

Choose a suitable mounting position in your room for installing the device. The SRT321 should be mounted on an internal wall approximately 1.5 metres from floor level using the wall plate provided and should be in a position away from draughts, direct heat and sunlight. Ensure that there will be enough space to allow easy access to the two retaining screws located at the base of the wall plate. Avoid installing the thermostat against or behind any large metal surfaces which could interfere with the radio signals.
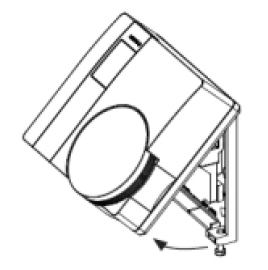
Offer the plate to the wall in the position where the SRT321 is to be mounted and mark the fixing positions through the slots in the wall plate. Drill and plug the wall, then secure the plate into position. The slots in the wall plate will compensate for any misalignment of the fixings. Undo the screws of the base of the thermostat and swing it away from the wallplate. Place the 2 x AAA batteries correctly into the battery compartment. Complete the installation by swinging the room thermostat into position by engaging with the lugs at the top of the wall plate before pushing it carefully into its plug-in terminal block. Tighten the 2 captive screws on the underside of the unit.
Product Usage
Thermostats using TPI (Time Proportional Integral) control algorithms will reduce the temperature swing that normally occurs when using traditional bellows or thermally operated thermostats. As a consequence, a TPI regulating thermostat will maintain the comfort level far more efficiently than any traditional thermostat.
When used with a condensing boiler, the TPI thermostat will help to save energy as the control algorithm allows the boiler to operate in condensing mode more consistently compared to older types of thermostat.
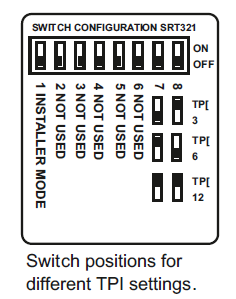
- DIL switch numbers 7 and 8 should be set as diagram opposite.
- For Gas boilers set the TPI setting to 6 cycles per hour. (Default setting)
- For Oil boilers set the TPI setting to 3 cycles per hour.
- For Electric heating set the TPI setting to 12 cycles per hour.
The DIL switch 1 has to be set to position "ON" for configuration mode. To go bacj to normal mode switch the DIL switch 1 to the "OFF" position.
Turn the rotating dial on the front within configuration mode and select the desired function by pushing the dial once:
- I Include Node onto network
- E Exclude Node from network
- N Transmit Node Information Frame (NIF)
- L Learn Mode - use this command for Include or Exclude with another controller (does not support control group replication) Inclusion and reception of a primary role (Controller Shift)
- Li Receive Period Enabled (Listening). This function will keep the unit awake for 60sec, no Pass or Fail response will be provided
- P Protocol Reset - Press twice to activate Will restore all parameters back to factory default settings
- A Associate Control Unit
- D Disassociate Control Unit
- C (Primary Shift) This function allows the installer to manually relinquish the primary controller role of the SRT321 to become a secondary or inclusion controller
| Reset to factory default | For reseting the device do the following steps: Set DIL switch 1 on the back of the unit to "ON" position, scroll through the function menu by rotating the dial, select "P". Confirm the procedure by double tapping the dial. Now your device is reset to factory defaults. |
| Inclusion | For including the thermostat as a secondary controller into an existing the Z-Wave network do the following steps: Bring your primary controller into inclusion mode. Set DIL switch 1 on the back of the unit to "ON" position, scroll through the function menu by rotating the dial, select "L". Once the character starts flashing the installer has 60 sec to activate the 3rd party unit, once the 3rd party unit has been activated the process must be completed within 240 sec or the thermostat will timeout. |
| Exclusion | For excluding the thermostat as a secondary controller into an existing the Z-Wave network do the following steps: Bring your primary controller into inclusion mode. Set DIL switch 1 on the back of the unit to "ON" position, scroll through the function menu by rotating the dial, select "L". Once the character starts flashing the installer has 60 sec to activate the 3rd party unit, once the 3rd party unit has been activated the process must be completed within 240 sec or the thermostat will timeout. |
| NIF | To send out a Node Information Frame do the following steps: Set DIL switch 1 on the back of the unit to |
| Wakeup | To wake up the device do the following steps: Set DIL switch 1 on the back of the unit to "ON" position, and select one of the konfiguration functions by pushing the rotating dial once. |
| Protection | XXXProtection |
| FirmwareUpdate | XXXFirmwareUpdate |
| SetAssociation | To assign associations with devices you wish to control with the thermostat do the following steps: Set DIL switch 1 on the back of the unit to "ON" position, scroll through the function menu by rotating the dial, select "A". Press the dedicated button on the target device you wish to control. To disassociate an association do the following steps: Set DIL switch 1 on the back of the unit to "ON" position, scroll through the function menu by rotating the dial, select "D". Press the dedicated button on the target device you wish to disassociate. |
Association Groups:
| Group Number | Maximum Nodes | Description |
|---|---|---|
| 1 | 1 | Lifeline |
| 2 | 4 | Thermostat Mode Control |
| 3 | 4 | Switch Control |
| 4 | 4 | Battery Info |
| 5 | 4 | Thermostat Set Point |
| 6 | 4 | Air Temperature |
Special Operations as Z-Wave Controller
As long as this device is not included into a Z-Wave network of a different controller it is able to manage its own Z-Wave network as primary controller. As a primary controller the device can include and exclude other devices in its own network, manage associations, and reorganize the network in case of problems. The following controller functions are supported:
Inclusion of other devices
Communication between two Z-Wave devices only works if both belong to the same wireless network. Joining a network is called inclusion and is initiated by a controller. The controller needs to be turned into the inclusion mode. Once in this inclusion mode the other device needs to confirm the inclusion - typically by pressing a button.
If current primary controller in your network is in special SIS mode this and any other secondary controller can also include and exclude devices.
To become primary a contoller have to be resetted and then include a device.
For Inclusion of Z-Wave devices into the thermostats network do the following steps: Set DIL switch 1 on the back of the unit to "ON" position, scroll through the function menu by rotating the dial, select "I". Press the dedicated button on the target device to include it. Once the character starts flashing the installer has 60 sec to activate the 3rd party unit, once the 3rd party unit has been activated the process must be completed within 240 sec or the thermostat will timeout.
Exclusion of other devices
The primary controller can exclude devices from the Z-Wave network. During exclusion the relationship between the device and the network of this controller is terminated. No communication between the device and other devices still in the network can happen after a successful exclusion. The controller needs to be turned into the exclusion mode. Once in this exclusion mode the other device needs to confirm the exclusion - typically by pressing a button.
Attention: Removing a device from the network means that it is turned back into factory default status. This process can also exclude devices from it's previous network.
For Exclusion of Z-Wave devices from the thermostats network do the following steps: Set DIL switch 1 on the back of the unit to "ON" position, scroll through the function menu by rotating the dial, select "E". Press the dedicated button on the target device to exclude it. Once the character starts flashing the installer has 60 sec to activate the 3rd party unit, once the 3rd party unit has been activated the process must be completed within 240 sec or the thermostat will timeout.
Shift of Primary Controller Role
The device can hand over its primary role to another controller and become secondary controller.
Set DIL switch 1 on the back of the unit to "ON" position, scroll through the function menu by rotating the dial, select "C". The thermostat will become the secondary controller.
Configuration Parameters
Parameter 1: Enables Temperature Sensor
controls the use of the temperature sensor on the device Size: 1 Byte, Default Value: 0
| Setting | Description |
|---|---|
| 0 - 127 | Disable |
| 128 - 255 | Enabled |
Parameter 2: Temperature Scale
Sensor will report temperature in this scale Size: 1 Byte, Default Value: 0
| Setting | Description |
|---|---|
| 0 - 127 | Celsius |
| 128 - 255 | Fahrenheit |
Parameter 3: Delta T
Size: 1 Byte, Default Value: 10
| Setting | Description |
|---|---|
| 0 - 255 | unknown |
Technical Data
| Dimensions | 86x86x36,25 mm |
| Weight | 137 gr |
| Hardware Platform | ZM5202 |
| EAN | 5015914250552 |
| IP Class | IP 30 |
| Battery Type | 2 * AAA LR3 |
| Firmware Version | 01.00 |
| Z-Wave Version | 04.05 |
| Certification ID | ZC08-11010003 |
| Z-Wave Product Id | 0x0059.0x0001.0x0005 |
| Frequency | Europe - 868,4 Mhz |
| Maximum transmission power | 5 mW |