Secure
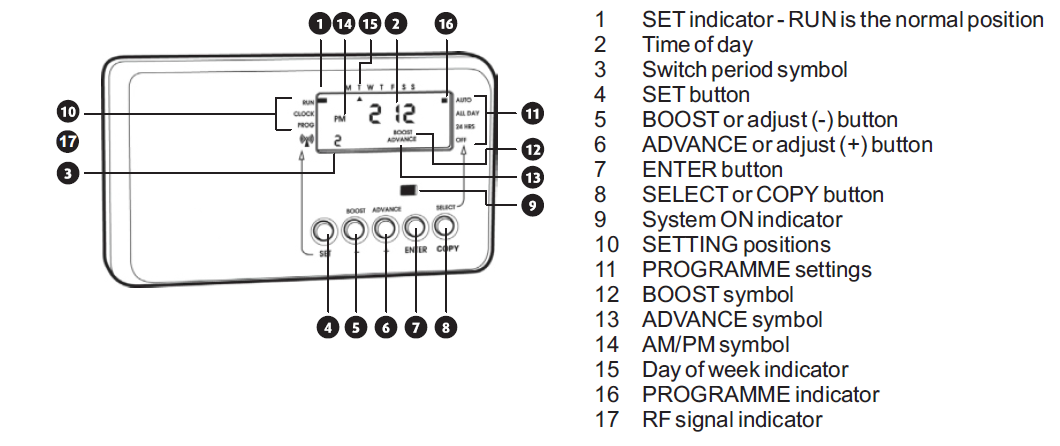
1 Channel Z-Wave 7 Day Time Control and RF Room Thermostat
SKU: SEC_SCP318-SET

Quickstart
This is a
Thermostat: For Inclusion of Z-Wave devices into the thermostats network do the following steps: Set DIL switch 1 on the back of the unit to "ON" position, scroll through the function menu by rotating the dial, select "I" to include nodes into the network or "E" to exclude a node from network. Time control: Press and hold the "Boost" and "Enter" buttons on the front of the timeswitch until an indicator appears in its display against the radio aerial symbol.
Important safety information
Please read this manual carefully. Failure to follow the recommendations in this manual may be dangerous or may violate the law. The manufacturer, importer, distributor and seller shall not be liable for any loss or damage resulting from failure to comply with the instructions in this manual or any other material. Use this equipment only for its intended purpose. Follow the disposal instructions. Do not dispose of electronic equipment or batteries in a fire or near open heat sources.What is Z-Wave?
Z-Wave is the international wireless protocol for communication in the Smart Home. This device is suited for use in the region mentioned in the Quickstart section.
Z-Wave ensures a reliable communication by reconfirming every message (two-way communication) and every mains powered node can act as a repeater for other nodes (meshed network) in case the receiver is not in direct wireless range of the transmitter.
This device and every other certified Z-Wave device can be used together with any other certified Z-Wave device regardless of brand and origin as long as both are suited for the same frequency range.
If a device supports secure communication it will communicate with other devices secure as long as this device provides the same or a higher level of security. Otherwise it will automatically turn into a lower level of security to maintain backward compatibility.
For more information about Z-Wave technology, devices, white papers etc. please refer to www.z-wave.info.
Product Description
The SEC_SCP318-SET combines a 7 day single channel timeswitch with a wireless Z-Wave Room thermostat and can be used for adding an extra zone into an existing installation. Because of its TPI energy saving software the user can start to save up to 10% energy consumption. The Programmer and Room thermostat communicate with each other via Z Wave commands.
Time control
The SEC_SCP318 timeswitch will allow up to 3 ON/OFF settings per 24 hours 7 days a week. To temporarily override current settings the device has an 1 hour manual Boost Function, which allows the user to boost the system to be currently OFF for 1 hour, and an Advance Function button, which allows the user to advance the system to ON when currently OFF or switch the system OFF when currently ON. Additionally the device has a programming switch allowing permanent selection of: OFF/ON/AUTO/ALL DAY.
Room thermostat
The battery operated wall thermostat has a big adjustment wheel which can be used to preset the desired target temperature in the room in a range of 5°C - 30°C. By verifying the target temperature with the measured real temperature closed to the device, the unit decides how to operate a wirelessly attached power switch that is attached to the heater. In parallel a central gateway of Z-Wave control software can set the target temperature using Z-Wave. This enables to realize a time scheduled zone heating. The thermostat itself does not have any internal timers but executes the wireless settings and the local setup.
Prepare for Installation / Reset
Please read the user manual before installing the product.
In order to include (add) a Z-Wave device to a network it must be in factory default state. Please make sure to reset the device into factory default. You can do this by performing an Exclusion operation as described below in the manual. Every Z-Wave controller is able to perform this operation however it is recommended to use the primary controller of the previous network to make sure the very device is excluded properly from this network.
Reset to factory default
This device also allows to be reset without any involvement of a Z-Wave controller. This procedure should only be used when the primary controller is inoperable.
Time control:
Press the "SET" and "SELECT" buttons together then release the buttons and the programmer will return to preset factory settings.
Thermostat:
For reseting the device do the following steps: Set DIL switch 1 on the back of the unit to "ON" position, scroll through the function menu by rotating the dial, select "P". Confirm the procedure by double tapping the dial. Now your device is reset to factory defaults.
Safety Warning for Mains Powered Devices
ATTENTION: only authorized technicians under consideration of the country-specific installation guidelines/norms may do works with mains power. Prior to the assembly of the product, the voltage network has to be switched off and ensured against re-switching.
Installation
Time control:
Fitting the backplate
Once the backplate has been removed from the packaging please ensure the timeswitch is re-sealed to prevent damage from dust and debris. The backplate should be fitted with the wiring terminals located at the top and in a position that allows a total clearance at last 50mm around the unit.
Direct wall mounting
Offer the backplate to the wall in the position where the timeswitch is to be mounted, remembering that the backplate fits to the left hand end of the control. Mark the fixing positions through the slots on the backplate (fixing centres of 60.3mm), drill and plug the wall, then secure the backplate in position. The slots in the backplate will compensate for any misalignments of the fixings.
Wiring box mounting
The backplate may be fitted directly onto a single gang steel flush wiring box complying with BS4662, using two M3.5 screws. The SCP318 is suitable for mounting on a flat surface only; they must not be positioned on a surface mounted wall box or on unearthed metal surfaces.
Electrical connections
All necessary electrical connections should now be made. Flush wiring can enter from the rear through the aperture in the backplate. Surface wiring can only enter from beneath the timeswitch and must be securely clamped. The mains supply terminals are intended to be connected to the supply by means of fixed wiring. Recommended cable sizes are 1.00 or 1.5mm2. The SCP318 is double insulated and does not require an earth connection but an earth connection is provided on the backplate for terminating cable earth connectors. Earth continuity must be maintained and all bare earth connectors must be sleeved. Ensure no earth conductors are left protruding outside the central space enclosed by the backplate.
Internal diagram - SCP318 Timeswitch
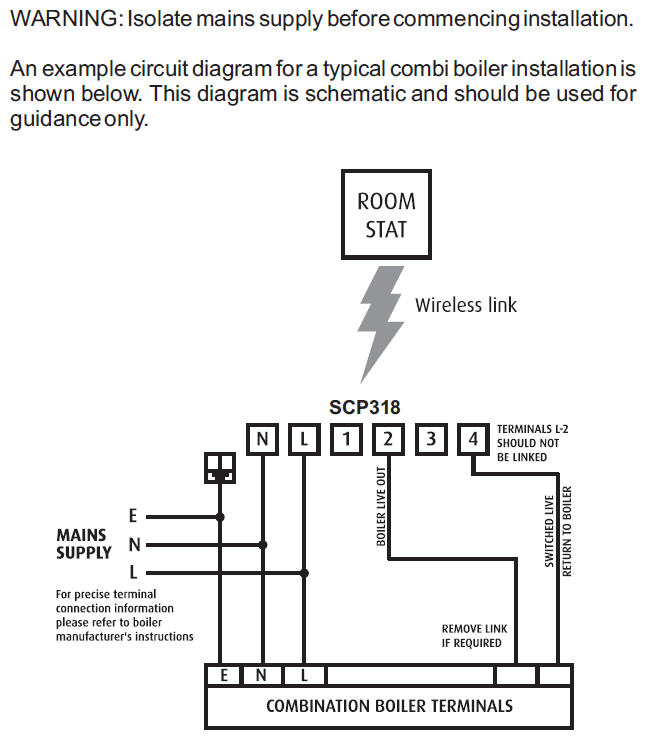
The SCP318 has voltage free contacts. A link L - 2 is required for mains voltage applications.
BATTERY: The timeswitch is fitted with a non-rechargeable, long life battery, which will maintain the programmed time settings for a minimum of ten months with the supply disconnected.
THIS SHOULD BE SUFFICIENT TO COVER POWER INTERRUPTIONS DURING THE LIFE OF THE UNIT.
During power interruptions the display will be blank, after 3 days the current time of day will be lost. These measures are to prolong the battery life.
Fitting the timeswitch
If surface wiring has been used, remove the knockout/insert from the bottom of the timeswitch to accommodate it. Loosen the two "captive" retaining screws on the bottom of the backplate. Now fit the timeswitch to the backplate, ensuring the lugs on the backplate engage with the switch. Swing the bottom of the timeswitch into position ensuring that the connection pins on the back of the unit locate into the terminal slots in the backplate. Tighten the two captive retaining screws to fix the unit securely. Then switch on the mains supply.
Resetting the timeswitch
On completion of the installation please reset the timeswitch. On the SCP318 timeswitch press the SET and SELECT buttons together. Then release the buttons and the timeswitch will return to preset factory settings. The unit is now ready to be signed on to the room thermostat, to suit the user"s requirements.Thermostat:

Choose a suitable mounting position in your room for installing the device. The SRT321 should be mounted on an internal wall approximately 1.5 metres from floor level using the wall plate provided and should be in a position away from draughts, direct heat and sunlight. Ensure that there will be enough space to allow easy access to the two retaining screws located at the base of the wall plate. Avoid installing the thermostat against or behind any large metal surfaces which could interfere with the radio signals.
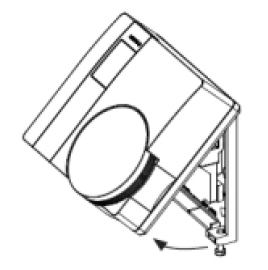
Offer the plate to the wall in the position where the SRT321 is to be mounted and mark the fixing positions through the slots in the wall plate. Drill and plug the wall, then secure the plate into position. The slots in the wall plate will compensate for any misalignment of the fixings. Undo the screws of the base of the thermostat and swing it away from the wallplate. Place the 2 x AAA batteries correctly into the battery compartment. Complete the installation by swinging the room thermostat into position by engaging with the lugs at the top of the wall plate before pushing it carefully into its plug-in terminal block. Tighten the 2 captive screws on the underside of the unit.
Pairing the devices: Pairing the devices is necessery to establish the Z-Wave connection on purpose to control the thermostat. See section Inclusion/Exclusion for the pairing.
The indicator against the radio mast symbol on the timeswitch shows that the radio link is established. A flashing indicator means that the wireless connection has been temporarily lost. This is usually restored by going to the thermostat and turning the dial up and down. If no indicator is present next to the radio mast symbol then this would suggest that the timeswitch and the thermostat have not been paired correctly on installation.
Inclusion/Exclusion
On factory default the device does not belong to any Z-Wave network. The device needs to be added to an existing wireless network to communicate with the devices of this network. This process is called Inclusion.
Devices can also be removed from a network. This process is called Exclusion. Both processes are initiated by the primary controller of the Z-Wave network. This controller is turned into exclusion respective inclusion mode. Inclusion and Exclusion is then performed doing a special manual action right on the device.
Inclusion
Thermostat: For Inclusion of Z-Wave devices into the thermostats network do the following steps: Set DIL switch 1 on the back of the unit to "ON" position, scroll through the function menu by rotating the dial, select "I" to include nodes into the network or "E" to exclude a node from network. Time control: Press and hold the "Boost" and "Enter" buttons on the front of the timeswitch until an indicator appears in its display against the radio aerial symbol.
Exclusion
Thermostat: For Inclusion of Z-Wave devices into the thermostats network do the following steps: Set DIL switch 1 on the back of the unit to "ON" position, scroll through the function menu by rotating the dial, select "I" to include nodes into the network or "E" to exclude a node from network. Time control: Press and hold the "Boost" and "Enter" buttons on the front of the timeswitch until an indicator appears in its display against the radio aerial symbol.
Product Usage
Time control:
The room thermostat will only operate during "On" periods set by the time control which is always indicated by the red neon indicator light on the front. If there is no light then the heating is "Off" and the room thermostat is inoperative. When the timeswitch is "On" (shown by the red indicator light) the thermostat will be operational and will provide very accurate control of the room temperature.
Manual Overrides
Boost Function - 1 Hour Temporary Override The boost facility will allow the user to boost the system which is currently "OFF" for 1 hour. To indicate the boost being activated BOOST will be shown on the display for the duration of the boost period. The system ON indicator will also be illuminated.
- Press BOOST button: Your system will be boosted for 1 hour
- At any time during a BOOST period press BOOST again to return to normal programming.
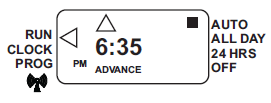
Advance Function - Brings forward the next on or off operation The advance facility will allow the user to advance the system to "ON" when currently "OFF" or switch the system "OFF" when currently "ON". To indicate the advance feature being activated ADVANCE will be shown on the display until the next programme switching time. The system ON indicator will also be illuminated.
- Press ADVANCE button once to move to the next ON/OFF time
- To cancel the advance press the ADVANCE button again. This will return the unit to its normal program.
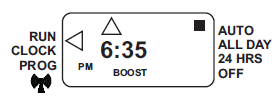
Programme Override Facilities
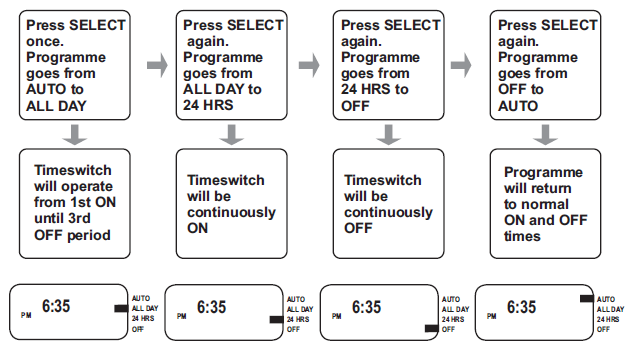
With the SCP318 timeswitch operating in the normal running mode it is possible to alter the functionality of the program by means of the SELECT button.
The options include
- Auto - Timeswitch follows all programmed "ON" and "OFF" times.
- All day - Timeswitch operates from 1st "ON" time until 3rd "OFF", ignoring all switching times in between.
- 24hrs - Timeswitch will be constantly "ON".
- Off - Timeswitch will be constantly "OFF", there is the ability to turn off the heating during the summer without altering the programme times. Boost is still available.
All of the settings above will be permanent, i.e. unaffected by programme times, until alteration by the user. The diagram below illustrates how to alter the setting, it assumes that the programme is in the AUTO mode to begin with.
Setting Time of Day and Date
The SCP318 timeswitch has a built in clock and calendar. This will mean that you will need to enter the date as well as the time on initial set up or if the factory re-set has been used. Having done this, the clock will automatically adjust for BST/GMT time changes throughout the year.
- Press the set button until the set indicator is next to the "clock" position.
- Use the + and - buttons to adjust the hour and press ENTER.
- Use the + and - buttons to adjust the minutes and press ENTER.
- Use the + and - buttons to set the date and press ENTER.
- Use the + and - buttons to set the month and press ENTER.
- Use the + and - buttons to set the year and press ENTER.
- Once the year is set and the ENTER button is pressed the process is complete and the display will return to the run position.
- Check that the correct time and day are showing in the display. If the wrong day is showing in the display that would indicate that the date has not been set correctly and the above process should be repeated.
Setting the On and Off Times
To alter these settings please proceed as follows:
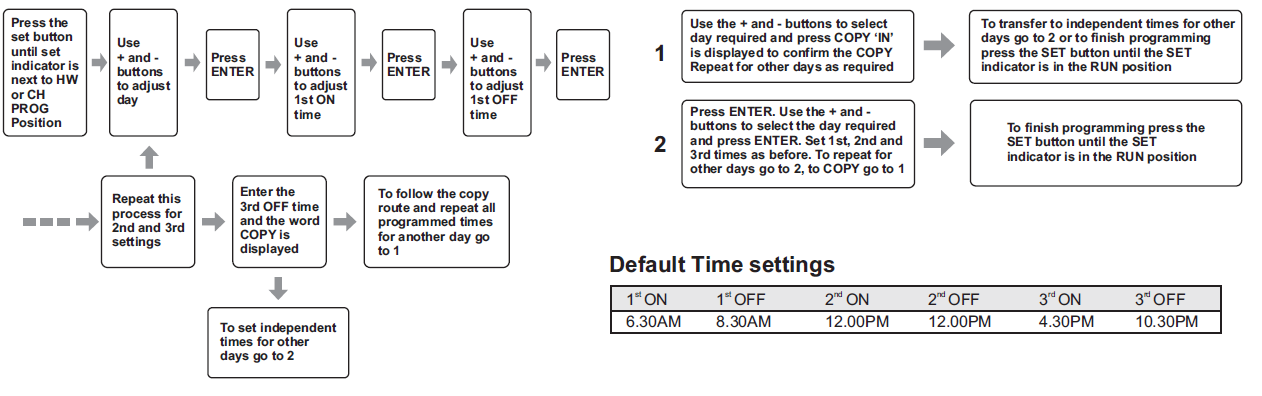
NB. The factory default settings for the 2nd ON/OFF times are both set at 12:00pm (midday) which cancels this "ON" period giving 2 ON/OFF periods for the day. If a midday "ON" period is required set the 2nd ON and OFF times accordingly. If not press ENTER twice.
Thermostat:
Thermostats using TPI (Time Proportional Integral) control algorithms will reduce the temperature swing that normally occurs when using traditional bellows or thermally operated thermostats. As a consequence, a TPI regulating thermostat will maintain the comfort level far more efficiently than any traditional thermostat.
When used with a condensing boiler, the TPI thermostat will help to save energy as the control algorithm allows the boiler to operate in condensing mode more consistently compared to older types of thermostat.
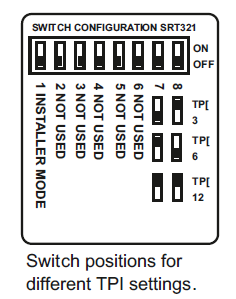
- DIL switch numbers 7 and 8 should be set as diagram opposite.
- For Gas boilers set the TPI setting to 6 cycles per hour. (Default setting)
- For Oil boilers set the TPI setting to 3 cycles per hour.
- For Electric heating set the TPI setting to 12 cycles per hour.
The DIL switch 1 has to be set to position "ON" for configuration mode. To go bacj to normal mode switch the DIL switch 1 to the "OFF" position.
Turn the rotating dial on the front within configuration mode and select the desired function by pushing the dial once:
- I Include Node onto network
- E Exclude Node from network
- N Transmit Node Information Frame (NIF)
- L Learn Mode - use this command for Include or Exclude with another controller (does not support control group replication) Inclusion and reception of a primary role (Controller Shift)
- Li Receive Period Enabled (Listening). This function will keep the unit awake for 60sec, no Pass or Fail response will be provided
- P Protocol Reset - Press twice to activate Will restore all parameters back to factory default settings
- A Associate Control Unit
- D Disassociate Control Unit
- C (Primary Shift) This function allows the installer to manually relinquish the primary controller role of the SRT321 to become a secondary or inclusion controller
Node Information Frame
The Node Information Frame (NIF) is the business card of a Z-Wave device. It contains information about the device type and the technical capabilities. The inclusion and exclusion of the device is confirmed by sending out a Node Information Frame. Beside this it may be needed for certain network operations to send out a Node Information Frame. To issue a NIF execute the following action:
Thermostat:
To send out a Node Information Frame do the following steps: Set DIL switch 1 on the back of the unit to
Communication to a Sleeping device (Wakeup)
This device is battery operated and turned into deep sleep state most of the time to save battery life time. Communication with the device is limited. In order to communicate with the device, a static controller C is needed in the network. This controller will maintain a mailbox for the battery operated devices and store commands that can not be received during deep sleep state. Without such a controller, communication may become impossible and/or the battery life time is significantly decreased.
This device will wakeup regularly and announce the wakeup state by sending out a so called Wakeup Notification. The controller can then empty the mailbox. Therefore, the device needs to be configured with the desired wakeup interval and the node ID of the controller. If the device was included by a static controller this controller will usually perform all necessary configurations. The wakeup interval is a tradeoff between maximal battery life time and the desired responses of the device. To wakeup the device please perform the following action:
Thermostat:
To wake up the device do the following steps: Set DIL switch 1 on the back of the unit to "ON" position, and select one of the konfiguration functions by pushing the rotating dial once.
Quick trouble shooting
Here are a few hints for network installation if things dont work as expected.
- Make sure a device is in factory reset state before including. In doubt exclude before include.
- If inclusion still fails, check if both devices use the same frequency.
- Remove all dead devices from associations. Otherwise you will see severe delays.
- Never use sleeping battery devices without a central controller.
- Dont poll FLIRS devices.
- Make sure to have enough mains powered device to benefit from the meshing
Special Operations as Z-Wave Controller
As long as this device is not included into a Z-Wave network of a different controller it is able to manage its own Z-Wave network as primary controller. As a primary controller the device can include and exclude other devices in its own network, manage associations, and reorganize the network in case of problems. The following controller functions are supported:
Inclusion of other devices
Communication between two Z-Wave devices only works if both belong to the same wireless network. Joining a network is called inclusion and is initiated by a controller. The controller needs to be turned into the inclusion mode. Once in this inclusion mode the other device needs to confirm the inclusion - typically by pressing a button.
If current primary controller in your network is in special SIS mode this and any other secondary controller can also include and exclude devices.
To become primary a contoller have to be resetted and then include a device.
Thermostat:
For Inclusion of Z-Wave devices into the thermostats network do the following steps: Set DIL switch 1 on the back of the unit to "ON" position, scroll through the function menu by rotating the dial, select "I". Press the dedicated button on the target device to include it. Once the character starts flashing the installer has 60 sec to activate the 3rd party unit, once the 3rd party unit has been activated the process must be completed within 240 sec or the thermostat will timeout.
Exclusion of other devices
The primary controller can exclude devices from the Z-Wave network. During exclusion the relationship between the device and the network of this controller is terminated. No communication between the device and other devices still in the network can happen after a successful exclusion. The controller needs to be turned into the exclusion mode. Once in this exclusion mode the other device needs to confirm the exclusion - typically by pressing a button.
Attention: Removing a device from the network means that it is turned back into factory default status. This process can also exclude devices from it's previous network.
Thermostat:
For Exclusion of Z-Wave devices from the thermostats network do the following steps: Set DIL switch 1 on the back of the unit to "ON" position, scroll through the function menu by rotating the dial, select "E". Press the dedicated button on the target device to exclude it. Once the character starts flashing the installer has 60 sec to activate the 3rd party unit, once the 3rd party unit has been activated the process must be completed within 240 sec or the thermostat will timeout.
Shift of Primary Controller Role
The device can hand over its primary role to another controller and become secondary controller.
Thermostat:
Set DIL switch 1 on the back of the unit to "ON" position, scroll through the function menu by rotating the dial, select "C". The thermostat will become the secondary controller.
Management of Association in the controller
Thermostat:
To assign associations with devices you wish to control with the thermostat do the following steps: Set DIL switch 1 on the back of the unit to "ON" position, scroll through the function menu by rotating the dial, select "A". Press the dedicated button on the target device you wish to control.
To disassociate an association do the following steps: Set DIL switch 1 on the back of the unit to "ON" position, scroll through the function menu by rotating the dial, select "D". Press the dedicated button on the target device you wish to disassociate.
Technical Data
| Dimensions | 87x236x44 mm |
| Weight | 329 gr |
| Hardware Platform | ZM3102 |
| EAN | 5015914298035 |
| Device Type | On/Off Power Switch |
| Generic Device Class | Binary Switch |
| Z-Wave Version | 4.52 |
| Certification ID | ZC08-12040002 |
| Z-Wave Product Id | 0x0059.0x0002.0x0002 |
| Frequency | Europe - 868,4 Mhz |
| Maximum transmission power | 5 mW |
Supported Command Classes
- Basic
- Manufacturer Specific
- Switch Binary
- Version
Explanation of Z-Wave specific terms
- Controller — is a Z-Wave device with capabilities to manage the network. Controllers are typically Gateways,Remote Controls or battery operated wall controllers.
- Slave — is a Z-Wave device without capabilities to manage the network. Slaves can be sensors, actuators and even remote controls.
- Primary Controller — is the central organizer of the network. It must be a controller. There can be only one primary controller in a Z-Wave network.
- Inclusion — is the process of adding new Z-Wave devices into a network.
- Exclusion — is the process of removing Z-Wave devices from the network.
- Association — is a control relationship between a controlling device and a controlled device.
- Wakeup Notification — is a special wireless message issued by a Z-Wave device to announces that is able to communicate.
- Node Information Frame — is a special wireless message issued by a Z-Wave device to announce its capabilities and functions.