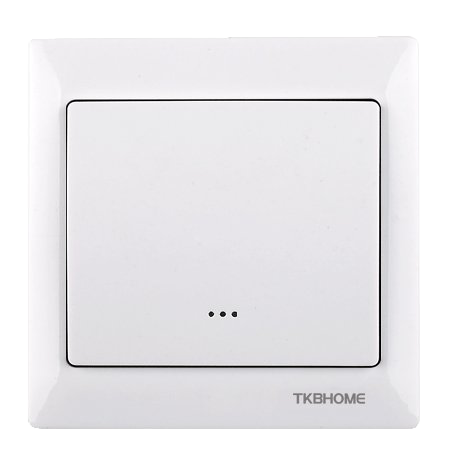
TKB Home
Z-Wave Single Paddle Wall Switch
SKU: TKB_TZ66-S
Quickstart
This is a
To include the device into the network, turn the controller into the inclusion mode and then press the upper or lower part of the paddle of the device. The device is now ready to work.
Important safety information
Please read this manual carefully. Failure to follow the recommendations in this manual may be dangerous or may violate the law. The manufacturer, importer, distributor and seller shall not be liable for any loss or damage resulting from failure to comply with the instructions in this manual or any other material. Use this equipment only for its intended purpose. Follow the disposal instructions. Do not dispose of electronic equipment or batteries in a fire or near open heat sources.Product Description
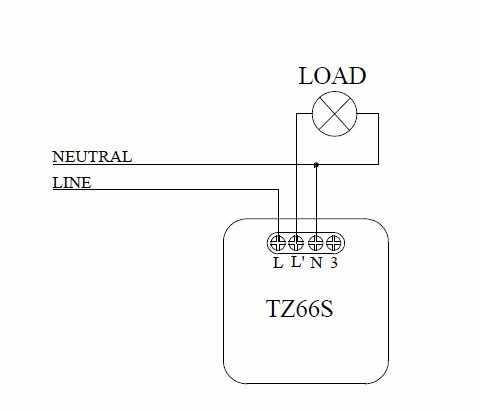
The TZ66-S single wall switch is switching attached loads and is controlled either by the local switching paddle or remotely via the Z-Wave wireless protocol. It is included and controlled in a Z-Wave network by a remote control, a wireless control centre or any other kind of Z-Wave controller including a PC-software. Beside the local switch the unit can control other Z-Wave units remotely in up to three additional Z-Wave groups, which are associated with this device. Tipping one time or two times the switching paddle performs the control. The association of further Z-Wave devices needs to be done by a Z-Wave controller. The unit is powered by 230V power and needs a pattress box with 230 V power wires for installation.
The unit is shipped completely with electronics, switching paddle and mounting frame in arctic white HomePro style, which can be replaced by another mounting frame of the HomePro switching series. The unit is designed for use within a 3-wire system, which means that a neutral wire (blue) is needed for operations.
Installation
The TZ66-S wall mounted switch needs a pattress box with 230 V power wires for installation. It does not fit into German wall boxes with 60 mm diameter.
- To install the wall switch first remove the paddle using a small screw driver.
- Afterwards remove the four screws through the retaining ring holding the trim ring to the mounting plate. This will allow the removal of the trim ring. When removing the trim ring make sure not to bend or disrupt the shape of the antenna wire.
- Wire the product according to the schematics. The two wired from the mains distribution panel are directly connected to the inserts contacts N and L. The contact L" is the switched load output and needs to be connected to the cable of the load.
- Install the product in the wall box.
- Reinstall the trim ring and the retaining ring with the four screws. Mind the arrow on the inserts top side showing the mounting direction of the insert.
- Return the switching paddle by pushing it into the mounting frame. Make sure the LED window is also towards the stamped word "??Bottom"? on the retaining ring.
Product Usage
The actuator is operated by the local switching paddle or wirelessly using Z-Wave commands. If the insert is mounted correctly pushing the upper part of the paddle will turn ON the load. Pushing the lower part of the paddle will turn OFF the electric load. Pressing and holding the switch will allow dimming and brightening of Z-Wave dimmers if associated.
The device is also able to report status changes to a controller (communication pattern 2) and to remotely operate other devices by sending wireless Z-Wave commands. As part of a Z-Wave network, the TZ66-S will also act as a wireless repeater to insure that commands intended for another devices in the network are received.
| Reset to factory default | XXXResetDescription |
| Inclusion | To include the device into a controllers Z-Wave network first setup the controller you are using into inclusion mode. Afterwards tap either the top or bottom of the switch once. The device is excluded by a single click on the switch when the controller is in exclusion mode. |
| Exclusion | To include the device into a controllers Z-Wave network first setup the controller you are using into inclusion mode. Afterwards tap either the top or bottom of the switch once. The device is excluded by a single click on the switch when the controller is in exclusion mode. |
| NIF | XXXNIF |
| Wakeup | XXXWakeupDescription |
| Protection | XXXProtection |
| FirmwareUpdate | XXXFirmwareUpdate |
| SetAssociation | XXXSetAssociation |
Association Groups:
| Group Number | Maximum Nodes | Description |
|---|---|---|
| 1 | 5 | every switching command |
Configuration Parameters
Parameter 1: Start Level Bit
defines if the start level bit shall be ignores when transmitting a dim command to a dimmer Size: 1 Byte, Default Value: 01
| Setting | Description |
|---|---|
| 00 | ignore |
| 01 | dont ignore |
Parameter 3: Night Light
Activates Night Light Size: 1 Byte, Default Value: 00
| Setting | Description |
|---|---|
| 00 | LED blinks on activity |
| 01 | Night Light active |
Parameter 4: Invert Switch
Inverts Switching (on is upper part) Size: 1 Byte, Default Value: 00
| Setting | Description |
|---|---|
| 00 | dont invert |
| 01 | invert |
Parameter 19: LED Transmission Indication
defines the behavior of the LED when transmitting data Size: 1 Byte, Default Value: 00
| Setting | Description |
|---|---|
| 00 | no flicker |
| 01 | flicker all time of data transmission |
| 02 | flicker for one second only |
Technical Data
| Dimensions | 0.0840000x0.0840000x0.0460000 mm |
| Weight | 107 gr |
| EAN | 6959174466508 |
| Device Type | Light Dimmer Switch |
| Generic Device Class | Multilevel Switch |
| Specific Device Class | Routing Multilevel Switch |
| Firmware Version | 01.03 |
| Z-Wave Version | 03.1c |
| Z-Wave Product Id | 0118.0808.0808 |
| Frequency | Europe - 868,4 Mhz |
| Maximum transmission power | 5 mW |